Overview
Autopsy uses Apache Solr to store keyword text indexes. A central server is needed in a multi-user cluster to maintain and search the indexes.
A new text index is created for each case and is stored in the case folder on shared storage (not on the local drive of the Solr server).
Solr's embedded ZooKeeper is also used as a coordination service for Autopsy.
Prerequisites
We use Bitnami Solr, which packages Solr as a Windows service.
You will need:
- A 64-bit version of the Java Runtime Environment (JRE) from http://www.oracle.com/technetwork/java/javase/downloads/jre8-downloads-2133155.html.
- The Apache Solr 4.10.3-0 installation package. This is no longer available from its original source, but you can find it on our site: https://sourceforge.net/projects/autopsy/files/CollaborativeServices/Solr. – NOTE: We tested Solr 6 at one point, but ran into stability problems when loading and unloading cores. For now, you need to use Solr 4.
- An installed version of Autopsy so that you can copy files from it. You can install Autopsy on one of the planned client systems. You do not need to install it on the Solr server.
- A network-accessible machine to install Solr on. Note that the Solr process will need to write data out to the main shared storage drive, and needs adequate permissions to write to this location, which may be across a network.
Installation
JRE Installation
- JREs are normally installed under "C:\Program Files\Java\jre(version)", so check there to see if you have one installed already. If not, get the installer as listed in the above Prerequisites section and install it with the default settings.
Solr Installation
The following steps will configure Solr to run using an account that will have access to the network storage.
- Run the Bitnami installer, "bitnami-solr-4.10.3-0-windows-installer.exe"
- If Windows prompts with User Account Control, click Yes
- Follow the prompts through to completion. You do not need to "Learn more about Bitnami cloud hosting" so you can clear the check box.
- If you see an error dialog like the following, you may safely ignore it.
- When the installation completes, clear the "Launch Bitnami Apache Solr Stack Now?" checkbox and click Finish.
Solr Configuration
- Stop the solrJetty service by pressing Start, typing services.msc, pressing Enter, and locating the solrJetty Windows service. Select the service and press Stop the service. If the service is already stopped and there is no Stop the service available, this is okay.
- Service Configuration: Edit the "C:\Bitnami\solr-4.10.3-0\apache-solr\scripts\serviceinstall.bat" script. You need administrator rights to change this file. The easiest way around this is to save a copy on the Desktop, edit the Desktop version, and copy the new one back over the top of the old. Windows will ask for permission to overwrite the old file; allow it. You should make the following changes to this file:
- Add the following options in the line that begins with "C:\Bitnami\solr-4.10.3-0/apache-solr\scripts\prunsrv.exe" :
- ++JvmOptions=-Dcollection.configName=AutopsyConfig
- ++JvmOptions=-Dbootstrap_confdir="C:\Bitnami\solr-4.10.3-0\apache-solr\solr\configsets\AutopsyConfig\conf"
- ++JvmOptions=-DzkRun
- Replace the path to JavaHome with the path to your 64-bit version of the JRE. If you do not know the path, the correct JavaHome path can be obtained by running the command "where java" from the Windows command line. An example is shown below. The text in yellow is what we are interested in. Do not include the "bin" folder in the path you place into the JavaHome variable. A correct example of the final result will look something like this: –-JavaHome="C:\Program Files\Java\jre1.8.0_111"
A portion of an updated serviceinstall.bat is shown below, with the changes marked in yellow.

- Add the following options in the line that begins with "C:\Bitnami\solr-4.10.3-0/apache-solr\scripts\prunsrv.exe" :
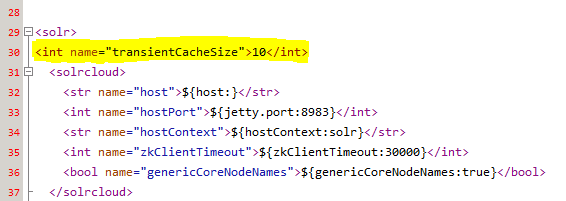
- Solr Configuration: Edit "C:\Bitnami\solr-4.10.3-0\apache-solr\solr\solr.xml" to set the transientCacheSize to the maximum number of cases expected to be open concurrently. If you expect ten concurrent cases, the text to add is <int name="transientCacheSize">10</int>
The added part is highlighted in yellow below. Ensure that it is inside the <solr> tag as follows:
- Log Configuration: Edit "C:\Bitnami\solr-4.10.3-0\apache-solr\resources/log4j.properties" to configure Solr log settings:
- Increase the log rotation size threshold (log4j.appender.file.MaxFileSize) from 4MB to 100MB.
- Remove the CONSOLE appender from the log4j.rootLogger line.
- Add the line "log4j.logger.org.apache.solr.update.processor.LogUpdateProcessor=WARN".

- Schema Configuration: From an Autopsy installation, copy the following into "C:\Bitnami\solr-4.10.3-0\apache-solr\solr":
- The folder "C:\Program Files\Autopsy-XXX(current version)\autopsy\solr\solr\configsets"
- The folder "C:\Program Files\Autopsy-XXX(current version)\autopsy\solr\solr\lib"
- The file "C:\Program Files\Autopsy-XXX(current version)\autopsy\solr\solr\zoo.cfg"
Reinstall Service
Because we made changes to the service configuration, we need to reinstall it.
- Start a Windows command prompt as administrator by pressing Start, typing command, right clicking on Command Prompt, and clicking on Run as administrator. Then run the following command to uninstall the solrJetty service:
       cmd /c C:\Bitnami\solr-4.10.3-0\apache-solr\scripts\serviceinstall.bat UNINSTALL

You will very likely see a result that says "The solrJetty service is not started." This is okay.
- In the same prompt, run the following command to install the solrJetty service:
cmd /c C:\Bitnami\solr-4.10.3-0\apache-solr\scripts\serviceinstall.bat INSTALL
Note the argument "INSTALL" is case sensitive. Your command prompt should look like the screenshot below. Very likely your command prompt will say "The solrJetty service could not be started." This is okay.

At this point you should be able to access the Solr admin panel in a web browser via the URL http://localhost:8983/solr/#/
Configure Service User
Back in Pick Your User Accounts, you should have decided what user to run Solr as. To configure Solr to run as that user, you'll use Windows Service Manager.
- Press Start, type services.msc, and press Enter.
- Find solrJetty. If the service is running, press Stop the service,
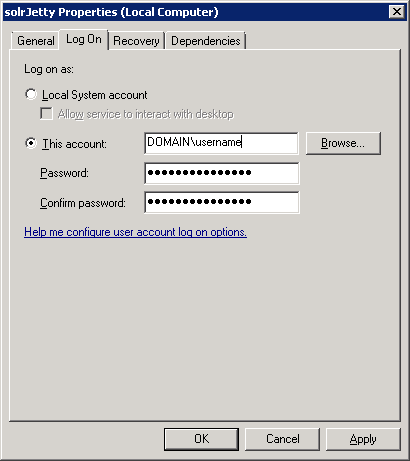
- Double click the service and switch to the Log On tab to change the logon credentials to the chosen user who will have access to the shared storage.
- If you specify a domain account, the account name will be in the form of DOMAINNAME\username as shown in the example below
- Start the service again.
Testing
There are two tests that you should perform to confirm that the Solr machine is configured correctly.
- Web Interface: You should attempt to access the Solr admin panel in a web browser from another machine on the network. Replace the IP address in the following URL with the IP address or the host name that the Solr service is running on: http://172.16.12.61:8983/solr/#/.
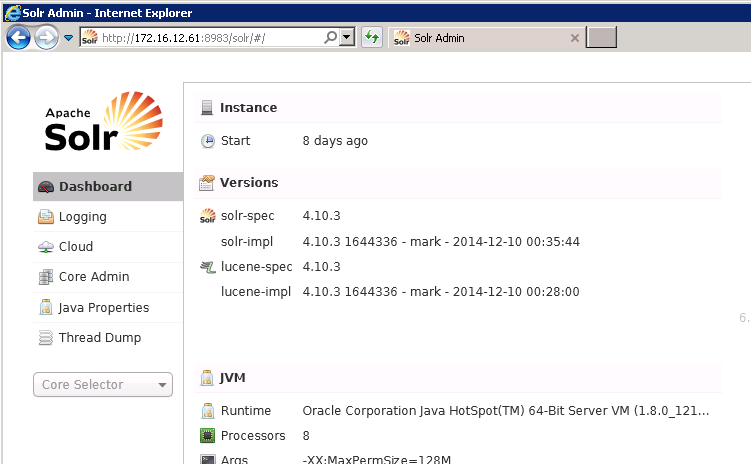
If the service is appropriately started but you are unable to see the screenshot above, then it could be that port 8983 for Solr and port 9983 for ZooKeeper are blocked by your firewall. Contact your network administrator to open these ports.
- Shared Storage: Log into the Solr computer as the user you decided to run the Solr service as and attempt to access the shared storage paths. Ensure that you can access the UNC paths (or drive letters if you have hardware NAS). If everything is configured correctly you should be able to access the storage paths without having to provide credentials. If you are prompted for a password to access the shared storage, then either enter the password and choose to save the credentials or reconfigure the setup so that the same passwords are used, etc. See Storing Credentials for steps on storing credentials. If you needed to store the credentials, then you should restart the service or reboot the computer (we have observed that a running service does not get the updated credentials).
NOTE: You can not do a full test of permissions until you make a test case after all of the services are configured.
Backing Up
Solr creates two types of data that need to be backed up:
- Text Indexes: These are stored in the case folder on the shared storage.
- ZooKeeper Data: Autopsy uses a service called ZooKeeper embedded in Solr that stores data about what cases exist and who has them open. This data needs to be backed up so that you can have a list of all available multi-user cases.
- In a default installation that data is stored in C:\Bitnami\solr-4.10.3-0\apache-solr\solr\zoo_data.