Table of Contents
Overview
A multi-user installation requires several network-based services, such as a central database and a messaging system, and automated ingest requires one or more auto ingest nodes. While you may run all of the external services on a single node, this is not likely to be ideal - spreading the services out across several machines can improve throughput. Keeping in mind that all the following machines need to be able to communicate with each other with network visibility to the shared drive, here is a description of a possible configuration:
| Number of Machines | Services |
|---|---|
| One |
|
| One |
|
| One |
|
| One or more |
|
| One or more |
|
Solr is going to be a sizeable resource hog. A big performance increase will be seen if you put solid state drives (SSD) in the machine running Solr, and have that machine also host the large network drive on the SSDs as a place to store case output. The source images to can be on SAS drives (slower than SSD) with very little impact on performance. This idea here is to have the most resource-intensive operations on the fastest hardware. Using this strategy, there are actually two large network stores, one for input images and one for output cases.
Installing Services and Configuring Autopsy
Follow the instructions on the Setting Up Multi-user Cluster page to set up the necessary services and configure your Autopsy clients to use them. After this is complete, you should be able to create and use multi-user cases.
Auto Ingest Node Configuration
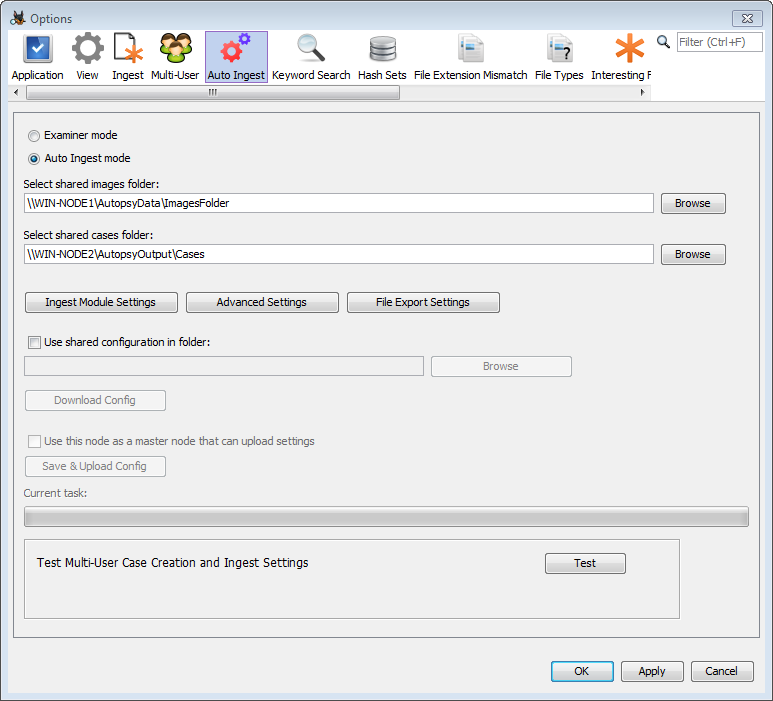
While Examiner nodes only require multi-user cases to be set up, the auto ingest nodes need additional configuration. To start, go to the "Auto Ingest" tab on the Options menu and select the "Auto Ingest mode" radio button. If you haven't saved your multi-user settings there will be a warning message displayed here - if you see it, go back to the "Multi-User" tab and make sure you've entered all the required fields and then hit the "Apply" button.
Folder Configuration
The first thing to do is to set two folder locations. The shared images folder is the base folder for all data that will be ingested through the auto ingest node. The shared cases folder is the base folder for the cases that will be created by the auto ingest node.
Ingest Module Settings
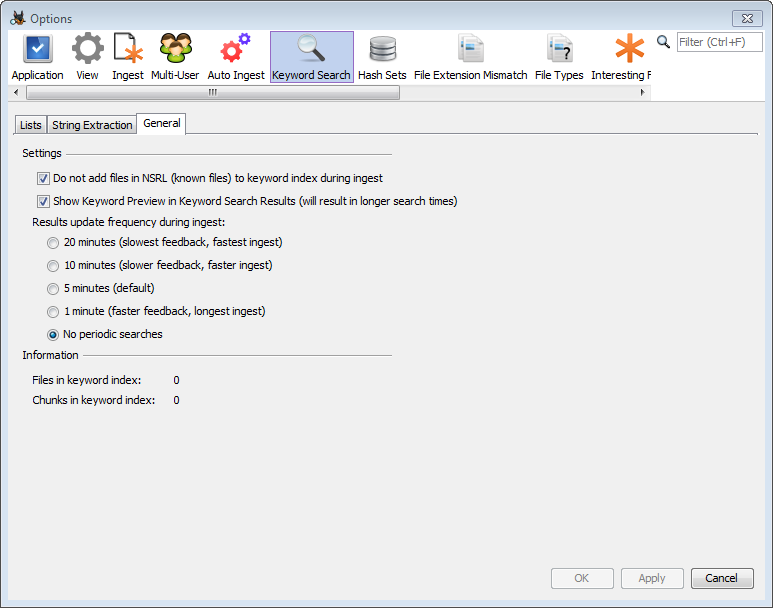
The "Ingest Module Settings" button is used to configure the Ingest Modules you want to run during auto-ingest. One note is that on auto-ingest nodes, we recommend that you configure the Keyword Search module to not perform periodic keyword searches. When a user is in front of the computer, this feature exists to provide frequent updates, but it is not needed on this node. To configure this, choose the Keyword Search item in the Options window. Select the "General" tab and choose the option for no periodic search.
Advanced Settings
The "Advanced Settings" button will bring up the automated ingest job settings. As expressed in the warning statement, care must be used when making changes on this panel.
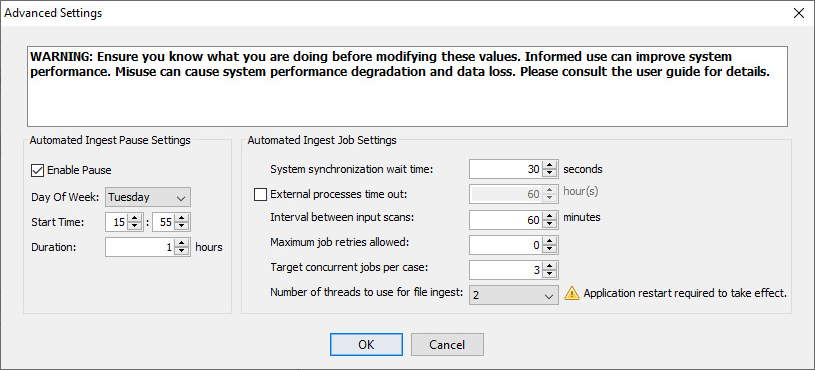
The Automated Ingest Pause Setting section lets you configure a weekly time period during which ingest will not run. This is useful if any of your network services has regularly scheduled downtime. Note that ingest isn't immediately stopped at the given "Start Time" - it will run until the current file is processed or the current ingest module is complete. For this reason, we suggest using a lead time of two hours before your system will go down. For example, if the network is not accessible from 4:00 PM to 5:00 PM every Sunday, you should set the start time to 14:00 and the duration to 3 hours (to cover the lead time and the down time).
The Automated Ingest Job Settings section contains the following options:
- System synchronization wait time
- A wait time used by auto ingest nodes to ensure proper synchronization of node operations in circumstances where delays may occur, e.g., a wait to compensate for network file system latency effects on the visibility of newly created shared directories and files.
- External processes time out
- Autopsy components that spawn potentially long-running processes have the option to use this setting, if it is enabled, to terminate those processes if the specified time out period has elapsed. Each component that uses this feature is responsible for implementing its own policy for the handling of incomplete processing when an external process time out occurs. Core components that use external process time outs include the Recent Activity Module and PhotoRec Carver Module ingest modules.
- Interval between input scans
- The interval between scans of the auto ingest input directories for manifest files. Note that the actual timing of input scans by each node depends on both this setting and node startup time.
- Maximum job retries allowed
- The maximum number of times a crashed auto ingest job will be automatically retried. No distinction is made between jobs that crash due to system error conditions such as power outages and jobs that crash due to input data source corruption. In general, input data source corruption should be handled gracefully by Autopsy, but this setting provides insurance against unforeseen issues with input data viability.
- Target concurrent jobs per case
- A soft limit on the number of concurrent jobs per case when multiple cases are processed simultaneously by a group of auto ingest nodes. This setting specifies a target rather than a hard limit because nodes are never idled if there are ingest jobs to do and nodes work cooperatively rather than rely on a centralized, load-balancing job scheduling service.
- Number of threads to use for file ingest
- The number of threads an auto ingest node dedicates to analyzing files from input data sources in parallel. Note that analysis of input data source files themselves is always single-threaded.
File Export
The "File Export" button will bring up the File Export settings. This allows certain types of files to be automatically exported during auto ingest. Setting up this feature requires knowledge of internal Autopsy data structures and can be ignored for users.
Shared Configuration
When using multiple auto ingest nodes, configuration can be centralized and shared with any auto ingest node that desires to use it. This is called Shared Configuration. The general idea is that you will set up one node (the "master") and upload that configuration to a central location. Then the other auto ingest nodes (the "secondary" nodes) will download that configuration whenever they start a new job. This saves time because you only need to configure one node, and ensures consistency across the auto ingest nodes.
Master Node
On the computer that is going to be the configuration master automated ingest node, follow the configuration steps described in above to configure the node. If you would like every automated ingest node to share the configuration settings, check the first checkbox in the Shared Configuration section of the Auto Ingest settings panel. Next select a folder to store the shared configuration in. This folder must be a path to a network share that the other machines in the system will have access to. Use a UNC path if possible. Next, check the "Use this node as a master node that can upload settings" checkbox which should enable the "Save & Upload Config" button. If this does not happen, look for a red error message explaining what settings are missing.
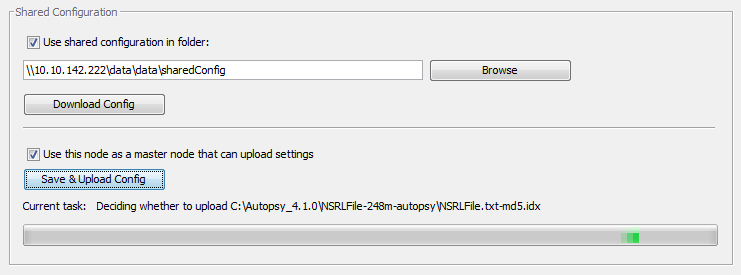
After saving and uploading the configuration, hit the "Save" button to exit the Options panel.
Secondary Node
Once one node has uploaded shared configuration data, the remaining nodes can be set up to download it, skipping over some of the configuration steps above.
To set up a secondary node, start by going through the multi-user configuration. Apply those changes, then switch to the Auto Ingest tab on the Options panel. Check the box to enable auto ingest, and then the box to enable shared configuration and enter the same folder used on the master node. The "Download Config" button should now be enabled and can be used to get the rest of the configuration automatically. Afterwards a dialog will likely appear telling you to restart Autopsy.
Notes
Some notes on shared configuration:
- The error suppression registry edit below will need to be done on each node
- After the initial setup, the current shared configuration data will be updated before each job (no need to manually download it again)
- A few options require a restart to take effect (for example, most of the multi-user settings). If these are downloaded automatically while automated ingest is running, they will not be used until the automated ingest node is restarted.
- There is currently a limitation on where hash databases can be saved. Each database will be downloaded to the same folder it was in on the master node, which will cause errors if that drive letter is not present or the folder is not writeable on every node.
- Shared copies of the hash databases are also not currently supported. Each node will download its own copy of each database.
Testing
Once everything is configured, you can use the "Test" button near the bottom of the panel to test if everything is set up correctly. The button will test whether the services are available, whether a case can be created, and if the ingest settings are valid. If the test passes you'll see a green check. If it fails you'll see a message giving a short description of what error occurred. Depending on the error you may also see a pop-up message. You can check the logs for additional information (close the Options panel and click on "Help" then "Open Log Folder").

Error Suppression
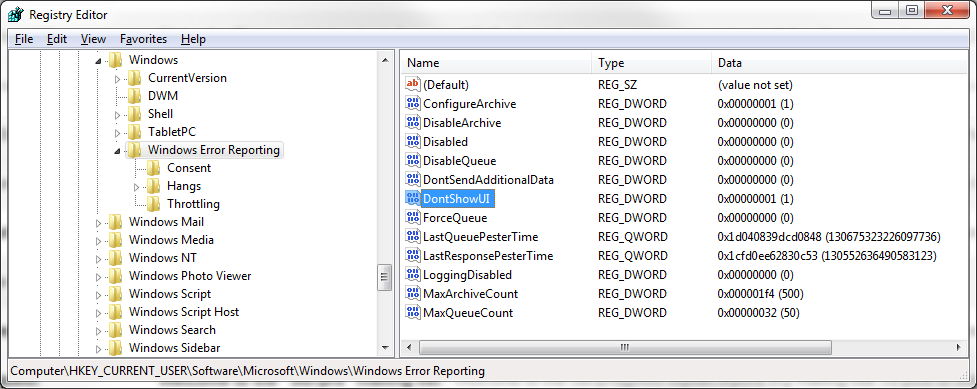
On an auto ingest node, we also strongly recommend that you configure the system to suppress error dialogs that Windows may display if an application crashes. Some of the modules that Autopsy runs have crashed on some test data in the past and if an error dialog is displayed all processing stops.
Disabling the error messages is done by setting the following registry key to "1", as shown in the screenshot below.
HKCU\Software\Microsoft\Windows\Windows Error Reporting\DontShowUI