Table of Contents
Overview
Autopsy uses Apache Solr to store keyword text indexes. A central server is needed in a multi-user cluster to maintain and search the indexes.
A new text index is created for each case. The index can be stored either on shared storage or on the local drive of the Solr server(s) (large amount of local storage is required).
Solr's embedded ZooKeeper is also used as a coordination service for Autopsy.
If you have already installed Solr 4 with a previous version of Autopsy, please see the Upgrading to Autopsy 4.18.0 (with Solr 8) page for information on how open older cases after the upgrade and migrate data.
NOTE: This document assumes you will be running Solr on Windows as a service. You can run it as a non-service or on another platform, but you'll need to understand the steps in this document to make that happen.
Prerequisites
You will need:
- A 64-bit version of the Java 8 Runtime Environment (JRE) from https://github.com/ojdkbuild/ojdkbuild. (Download links)
- Pre-packaged Autopsy version of Solr from here. This contains Solr, NSSM to make it run as a service, and the needed schema config files.
- A network-accessible machine to install Solr on. Note that the Solr process may need to write to a shared storage drive (if that is how you configure it) and will therefore need adequate permissions.
Solr Installation
JRE Installation
Solr requires a Java Runtime Environment (JRE), which may already be installed. You can test this by running "where java" from the command line. If you see output similar to the results below, you have a JRE.

If you need the JRE, use the link in the Prerequisites section above to download an installer. Accept the default settings during installation.
Solr Configuration
Follow these steps to configure Solr:
-
Extract the solr-8.6.3.zip archive from the location given in the Prerequisites section into a directory of your choice. The rest of this document assumes that the archive is extracted into
"C:\solr-8.6.3"directory. -
Go to the
"C:\solr-8.6.3\bin"directory and open the"solr.in.cmd"file in a text editor.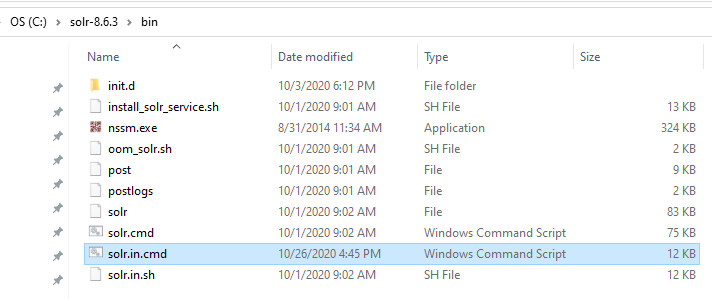
-
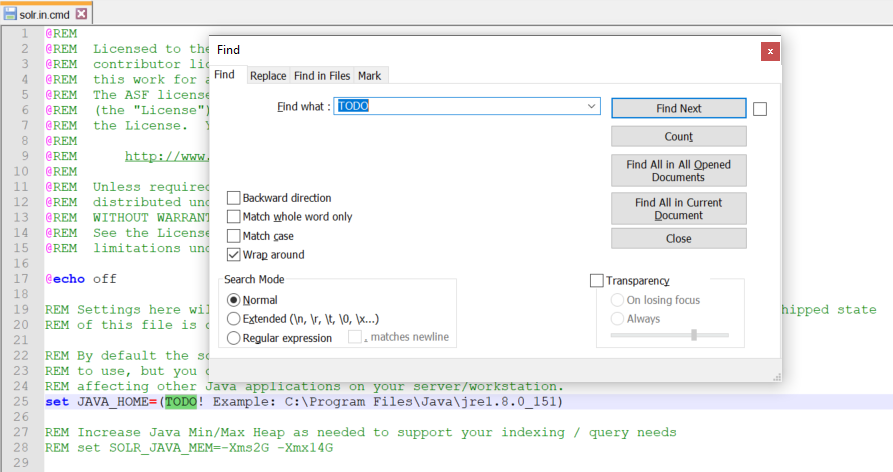
Search for each "TODO" and specify a valid path for each of the required configuration parameters. These parameters will be described in detail below.
Solr Configuration Parameters
Required Solr Configuration Parameters:
-
JAVA_HOME – path to 64-bit JRE installation. For example
"JAVA_HOME=C:\Program Files\Java\jre1.8.0_151"or"JAVA_HOME=C:\Program Files\ojdkbuild\java-1.8.0-openjdk-1.8.0.222-1" -
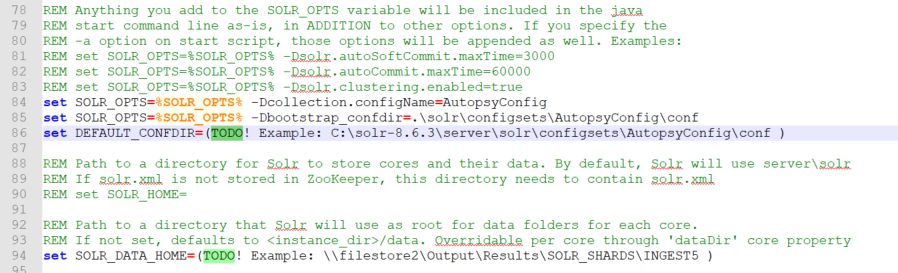
DEFAULT_CONFDIR – path to Autopsy configuration directory. If the Solr archive was extracted into
"C:\solr-8.6.3"directory, then this path will be"C:\ solr-8.6.3\server\solr\configsets\AutopsyConfig\conf". Do not include quotes around the path. - SOLR_JAVA_MEM - Solr JVM heap size should be as large as the Solr machine’s resources allow, at least half of the total RAM available on the machine. A rule of thumb would be use "set SOLR_JAVA_MEM=-Xms2G -Xmx40G" for a machine with 64GB of RAM, "set SOLR_JAVA_MEM=-Xms2G -Xmx20G" for a machine with 32GB of RAM, and "set SOLR_JAVA_MEM=-Xms2G -Xmx8G" for a machine with 16GB of RAM. Please see the troubleshooting section for more info regarding Solr heap usage and troubleshooting information.
-
SOLR_DATA_HOME – location where Solr indexes will be stored. If this is not configured, the indexes will be stored in the
"C:\solr-8.6.3\server\solr"directory. NOTE: for Autopsy cases consisting of large number of data sources, Solr indexes can get very large (hundreds of GBs, or TBs) so they should probably be stored on a larger network share.
Optional Solr Configuration Parameters:
- SOLR_HOST – by default, the Solr node name is "localhost". If multiple Solr nodes are going to be used as part of Solr Cloud, then specify the current computer’s host name in the SOLR_HOST variable.
Solr Text Index File Location
Important note: previous versions of Autopsy (Autopsy 4.17.0 and earlier) stored the Solr text indexes in the case output directory. As a result, the Solr indexes would get deleted if a user deleted the case output directory. Solr 8 (i.e. Autopsy 4.18.0 and later) no longer stores the Solr text index files in the case output directory but instead stores them in location defined by the SOLR_DATA_HOME parameter. As a consequence, if a user choses to manually delete case output directories (for example, to free up disk space), the Solr index directories located in SOLR_DATA_HOME need to be manually deleted as well.
Text index for an Autopsy case will follow a naming structure according to following rules: "[Autopsy case name] [Case creation time stamp] [Text index creation time stamp] [shardX_replica_nY]". For example, the text index for an Autopsy case "Test Case" will be located in the following directory inside SOLR_DATA_HOME:

Solr Windows Service Installation
At this point Solr has been configured and ready to use. The last step is to configure it as a Windows service so that it starts each time the computer starts.
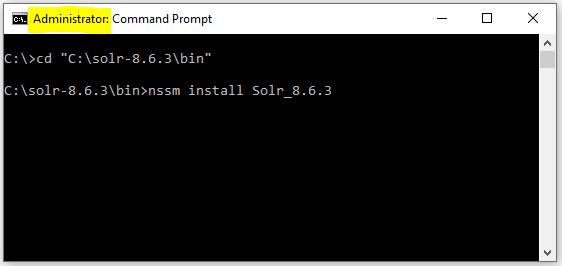
Open a command line console as Administrator and navigate to the "C:\solr-8.6.3\bin" directory. From there, run the following command: "nssm install Solr_8.6.3".
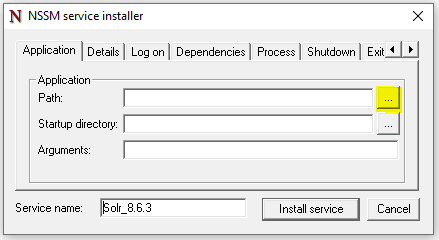
An NSSM UI window will appear. Click the "Path" navigation button:
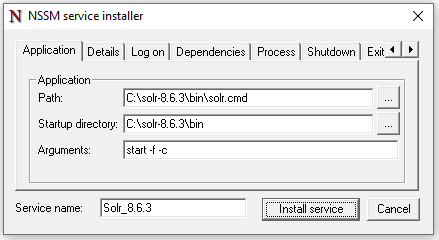
Select the "C:\solr-8.6.3\bin\solr.cmd" file. NOTE: Make sure you don’t select the "solr.in.cmd" file by accident. In the "Arguments" parameter, type in "start –f –c":
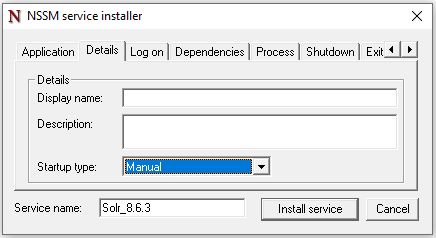
Optionally, configure service’s display name, startup type, and account info:
Configure Service User
In the Pick Your User Accounts section, you should have decided what user to run Solr as. To configure Solr to run as that user, you'll use Windows Service Manager.
Switch to the "Log On" tab to change the logon credentials to the chosen user who will have access to the shared storage.
-
If you specify a domain account, the account name will be in the form of
"DOMAINNAME\username"as shown in the example below
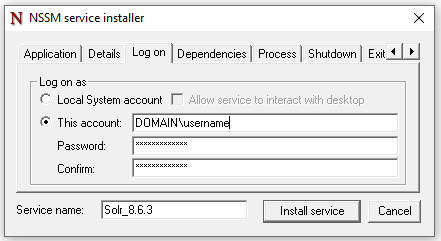
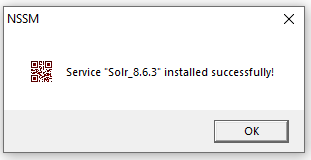
Click "Install Service". You should see the following UI window appear:
Start Solr Service
At this point the Solr service has been configured and installed. You can verify this by opening Windows "Services" window:
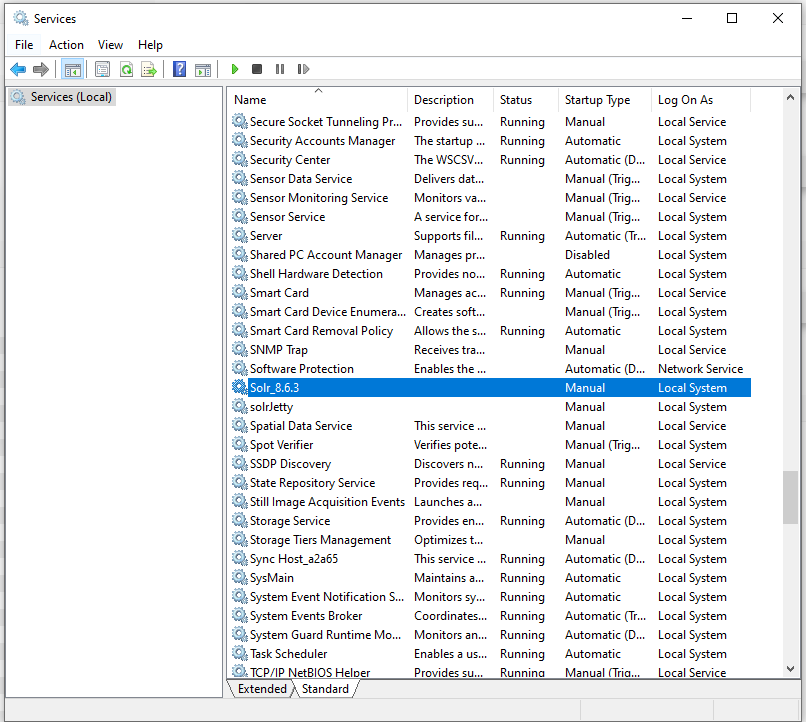
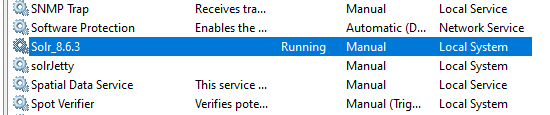
Start the "Solr_8.6.3" service, and verify that the service status changes to "Running".
Testing
There are two tests that you should perform to confirm that the Solr machine is configured correctly.
-
Web Interface: You should attempt to access the Solr admin panel in a web browser. On the Solr machine, navigate to http://localhost:8983/solr/#/ and verify that the Solr admin console gets displayed. You should also attempt to access the Solr admin panel in a web browser from another machine on the network. Replace "localhost" in the previous URL with the IP address or the host name that the Solr service is running on.
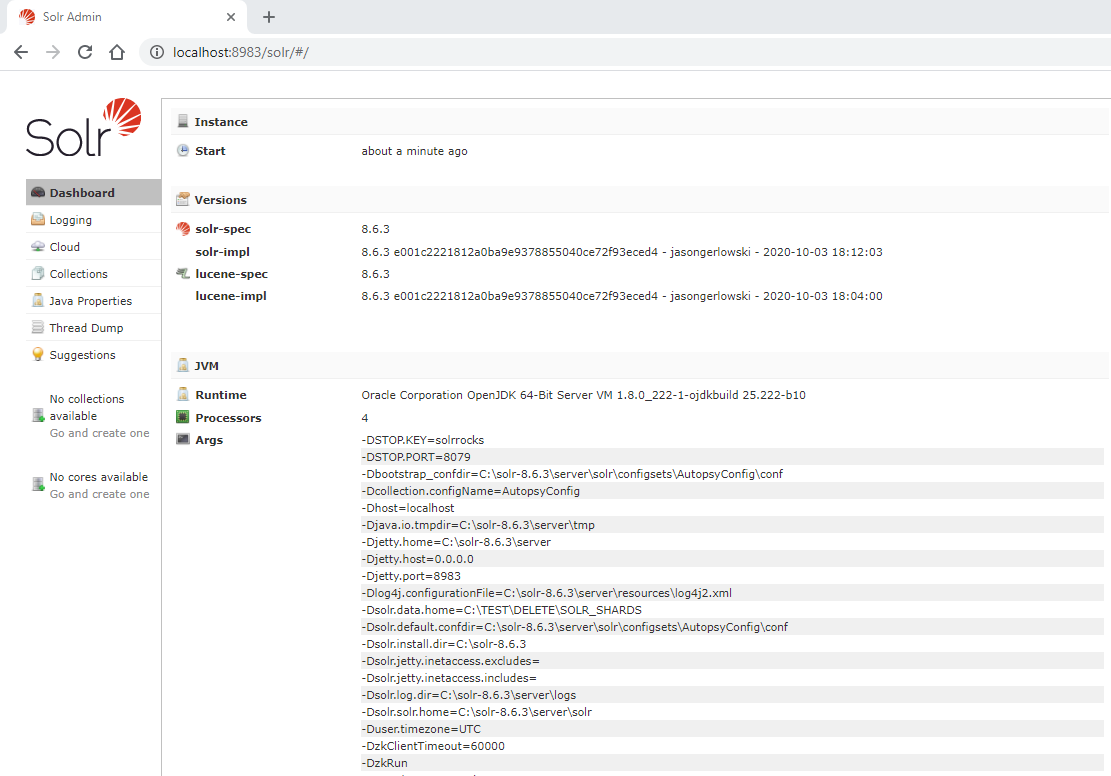
If the service is appropriately started but you are unable to see the screenshot above, then it could be that port 8983 for Solr and port 9983 for ZooKeeper are blocked by your firewall. Contact your network administrator to open these ports.
- Shared Storage: Log in to the Solr computer as the user you decided to run the Solr service as and attempt to access the shared storage paths. Ensure that you can access the UNC paths (or drive letters if you have hardware NAS). If everything is configured correctly you should be able to access the storage paths without having to provide credentials. If you are prompted for a password to access the shared storage, then either enter the password and choose to save the credentials or reconfigure the setup so that the same passwords are used. See the Storing Credentials section for steps on storing credentials. If you needed to store the credentials, then you should restart the service or reboot the computer (we have observed that a running service does not get the updated credentials).
Configuring Autopsy Clients
Once the rest of the services are configured you will configure Autopsy to enable multi-user cases. For the Solr 8 server, configure the Solr 8 Service and the ZooKeeper service connection info. ZooKeeper connection info is required. The ZooKeeper port number is 1000 higher than Solr service port number. By default, Solr service port is 8983 making the embedded ZooKeeper port 9983. You may also use a standalone ZooKeeper service.
Adding More Solr Nodes (SolrCloud)
Solr 8 has ability for multiple Solr nodes to work together as a Solr cluster. In this mode (SolrCloud mode) each Solr collection/index is split across all of the available Solr nodes. This is called sharding. For example, if there are 4 Solr nodes in a SolrCloud cluster, then the text index will be split across the 4 Solr nodes, thus greatly reducing the load on each individual Solr server and improving Solr indexing and searching performance.
To create a Solr cluster, the following steps need to be taken:
- Follow steps in the Solr Configuration and Solr Windows Service Installation sections to create a Solr node (e.g. "Solr1"). Start the Solr service on the Solr1 machine. This machine will host the ZooKeeper service for the SolrCloud cluster.
- To add an additional Solr node (e.g. "Solr2") to the SolrCloud cluster, follow the steps in the Solr Configuration and Solr Windows Service Installation sections on the Solr2 machine. Do not start the Solr service on Solr2 yet.
-
Solr uses ZooKeeper for its internal coordination, so all of the Solr nodes in SolrCloud need to be pointed at the same ZooKeeper service instance. Therefore in order for Solr2 node to be part of SolrCloud, it needs to use the ZooKeeper service that all the other Solr nodes in the SolrCloud cluster are using. In step 1 we have configured Solr1 node to start its embedded ZooKeeper service (this is default Solr behavior). To achieve that, ZK_HOST setting on Solr2 needs to be changed to point at the ZooKeeper service that is running on Solr1 node. The ZooKeeper port number is 1000 higher than SOLR_PORT. By default, SOLR_PORT is 8983 so the embedded ZooKeeper port is 9983. Therefore the ZK_HOST setting in
"C:\solr-8.6.3\bin\solr.in.cmd"file (assuming that the Solr package ZIP was extracted into"C:\solr-8.6.3\"directory) on Solr2 machine needs to be modified to use ZooKeeper service running on Solr1:9983.
- Start Solr service on Solr2 machine.
-
When you log into a Solr admin console on either Solr1 or Solr2 (via either going to http://localhost:8983/solr/#/ on the machine, or via http://solr1:8983/solr/#/), and then navigate to "Cloud" -> "Nodes" section of the admin tree, you should see all of the Solr nodes that are part of the SolrCloud:
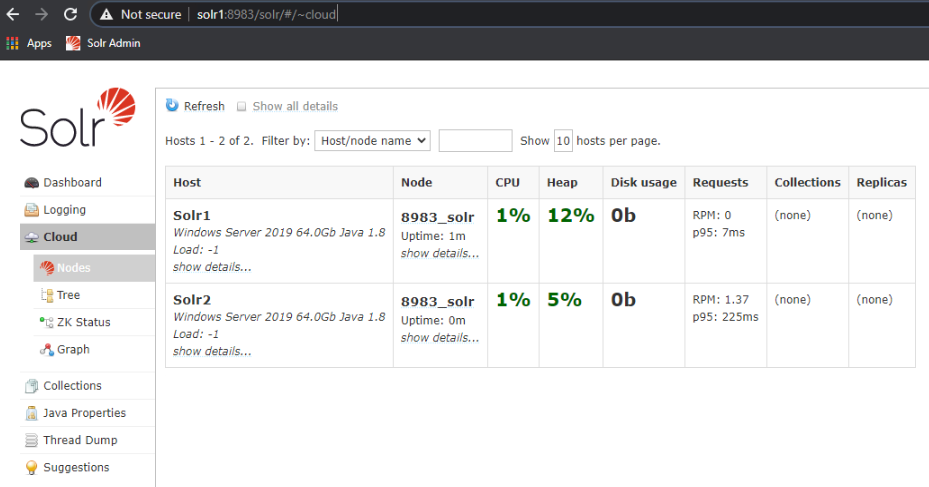
- Additional Solr nodes can be added to the SolrCloud by repeating the previous steps.
Autopsy’s Use of ZooKeeper Service
Autopsy uses ZooKeeper service for multi-user coordination purposes. Autopsy uses ZooKeeper to obtain locks on case level resources before modifying them. Most importantly, Autopsy stores some of its internal state data in ZooKeeper – which cases have been created, their processing state (pending, processing, or completed), as well as other case and job level state data. This is especially important if you are running Autopsy in Auto Ingest Mode, as auto ingest needs to know which jobs have already been processed.
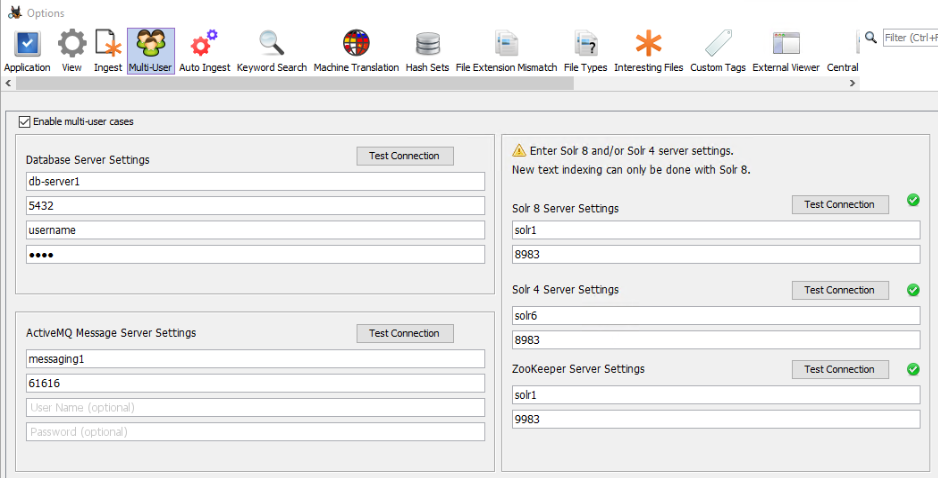
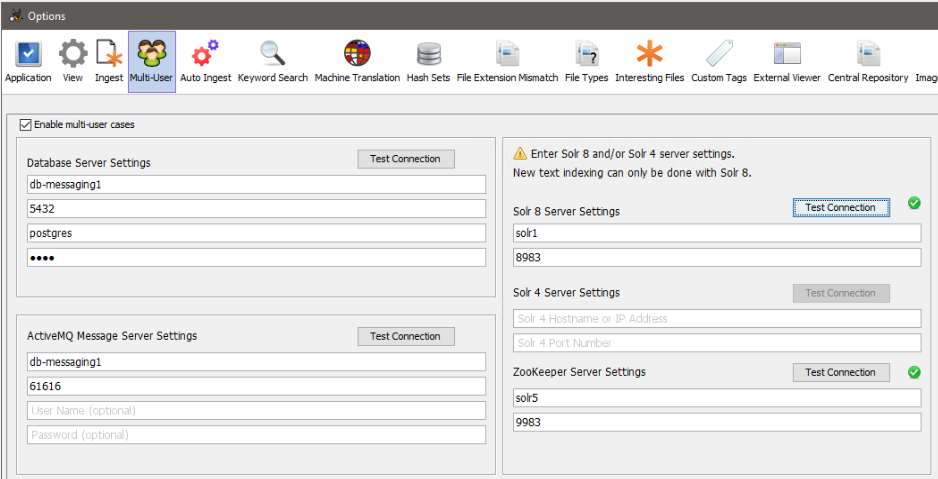
In the screen shot below, for coordination purposes Autopsy will be using the ZooKeeper server that is running on the Solr 8 server ("Solr1" machine).
Standalone ZooKeeper Server
In our testing, for Autopsy purposes it is not necessary to have a standalone ZooKeeper server. For the regular Autopsy use case it is sufficient to use the "embedded" ZooKeeper service that is started by Solr service (on port 9983). However, Apache Solr documentation recommends that a standalone ZooKeeper service (running on separate a machine) is used in production environments. Below are instructions on how to setup a standalone ZooKeeper server and how to configure Solr & Autopsy to use it.
General Solr-related steps for this process are outlined in the Solr user guide below, in section "SolrCloud Configuration and Parameters":
https://lucene.apache.org/solr/guide/8_6/solrcloud-configuration-and-parameters.html
-
Download the appropriate Zookeeper installation from http://zookeeper.apache.org/releases.html . Solr 8.6.3 is integrated with Zookeeper 3.5.7. There are several options for download – binaries or source code. The file that you are looking for is
"apache-zookeeper-3.5.7-bin.tar.gz": https://archive.apache.org/dist/zookeeper/zookeeper-3.5.7/ - Extract the downloaded tar file containing Zookeeper installation
-
Create/edit the
"/conf/zoo.cfg"file to have the following:- Specify "dataDir" directory – this is where ZK database will be stored.
- Specify "clientPort". For example, "clientPort=9983".
- "Four letter commands" need to be enabled in ZK config file: https://lucene.apache.org/solr/guide/8_6/setting-up-an-external-zookeeper-ensemble.html#configuration-for-a-zookeeper-ensemble
-
There are Windows and Linux Zookeeeper startup scripts. For Windows, open a command prompt (admin NOT required), go to the directory where the tar file was extracted (e.g.
"C:\Bitnami\zookeeper-3.5.7"), and type in"bin\zkServer.cmd". We have been using Cygwin in our testing and therefore using Linux commands in our examples. For Linux/CygWin, go to the same directory (e.g."C:\Bitnami\zookeeper-3.5.7"), and type in"bin/zkServer.sh start". -
To verify that Zookeeper is running, in command prompt one can type in
"bin/zkServer.sh status"(or equivalent Windows command).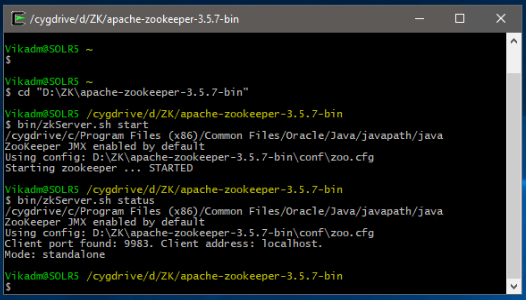
-
To make Solr use the external ZooKeeper, the following needs to be done. Navigate to the directory where Solr startup scripts are located (usually
"C:\solr-8.6.3\apache-solr\bin"). Open the"solr.in.cmd"file in text editor. If standalone ZooKeeper service is running on the same machine (not recommended), edit the ZK_HOST variable to be"set ZK_HOST=localhost:9983". If Zookeeper is running a different machine (e.g. "Solr5"), then enter the Zookeeper machine's host name or IP address instead of "localhost" (e.g."set ZK_HOST=Solr5:9983").
- Re-installation of Solr service is not necessary. Simply stop the Solr service and re-start it.
-
Once the Solr service has been restarted, you can navigate to Solr admin console (Cloud -> ZK Status) and verify that Solr is using the correct Zookeeper and that the Zookeeper is running.
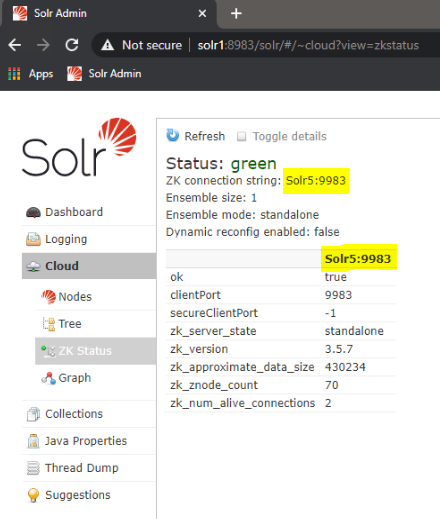
-
Configure Autopsy Multi-User panel to use the standalone ZooKeeper server. Start Autopsy and open the multi-user settings panel from "Tools", "Options", "Multi-user". Note that in order to create or open Multi-user cases, "Enable Multi-user cases" must be checked and the settings below must be correct.
Backing Up
Solr creates two types of data that need to be backed up:
- Text Indexes: These are stored in directory that was specified in SOLR_DATA_HOME parameter (see Solr Configuration Parameters).
-
ZooKeeper Data: Autopsy uses a service called ZooKeeper embedded in Solr that stores data about what cases exist and who has them open. This data needs to be backed up so that you can have a list of all available multi-user cases.
-
In a default installation that data is stored in
"C:\solr-8.6.3\server\solr zoo_data"(assuming that the Solr package ZIP was extracted into"C:\solr-8.6.3"directory).
-
In a default installation that data is stored in
Troubleshooting / Performance Tuning
Delayed Start Problems With Large Number Of Solr Collections
In our testing, we have encountered an issue when a very large number (thousands) of Autopsy multi-user cases was created. Each new Autopsy multi-user case creates a Solr "collection" that contains the Solr text index. With 2,000 existing collections, when Solr service is restarted, Solr appears to internally be "loading" roughly 250 collections per minute (in chronological order, starting with oldest collections). After 4 minutes roughly half of the 2,000 collections were loaded. Users are able to search the collections that have been loaded, but they are unable to open or search the collections that have not yet been internally loaded by Solr. After 7-8 minutes all collections were loaded. These numbers will vary depending on the specific cluster configuration, text index file location (network or local storage), network throughput, number of Solr servers, etc.
Solr Heap Usage and Recommendations
Solr JVM heap plays especially important role if you are going to create a large number of Autopsy cases (i.e. Solr collections). Here are some “rule of thumb” Solr heap usage stats that we identified during our internal testing:
- For very small cases/collections, our tests show that Solr uses an absolute minimum of 7-10 MB of heap per collection.
- For larger cases/collections (50-100GB input E01 size) Solr uses at least 65 MB per collection
- For large cases/collections (1.5TB input E01 size) Solr uses at least 850 MB per collection
Troubleshooting Solr Heap Issues
Once the Solr JVM uses all of its available heap and is unable to free up any memory via garbage collection, the Solr service will not be able to create new collections or may become completely unresponsive, resulting in Autopsy being unable to create new text indexes. Below is a list of some of the errors that you might see as a result of this in the Solr (not Autopsy) service logs and/or the Solr admin console:
- org.apache.solr.common.SolrException: Could not register as the leader because creating the ephemeral registration node in ZooKeeper failed
- RequestHandlerBase org.apache.solr.common.SolrException: Failed to get config from zookeeper
- RecoveryStrategy Error while trying to recover. org.apache.solr.common.SolrException: Cloud state still says we are leader.
- RequestHandlerBase org.apache.solr.common.SolrException: Could not load collection from ZK
- org.apache.solr.common.SolrException: Error CREATEing SolrCore: Unable to create core. Caused by: There are no more files
- org.apache.solr.common.SolrException: java.io.IOException: There are no more files
- org.apache.solr.common.SolrException: Cannot unload non-existent core
- ZkIndexSchemaReader Error creating ZooKeeper watch for the managed schema
You may also see the following ZooKeeper errors:
- org.apache.zookeeper.KeeperException$NodeExistsException: KeeperErrorCode = NodeExists
- org.apache.zookeeper.KeeperException$BadVersionException: KeeperErrorCode = BadVersion for (collection_name)/state.json
- org.apache.zookeeper.KeeperException$SessionExpiredException: KeeperErrorCode = Session expired for /roles.json
- org.apache.zookeeper.KeeperException$SessionExpiredException: KeeperErrorCode = Session expired for /configs/AutopsyConfig/managed-schema
The common theme among most of these errors is the breakdown in communication between Solr and ZooKeeper, especially when using an embedded ZooKeeper server. It is important to note that these errors may potentially occur for other reasons and are not unique to Solr heap issues.
Monitoring Solr Heap Usage
The simplest way to see current Solr heap usage is to check the Solr Admin Console web page. To access the Solr admin console, on the Solr machine navigate to http://localhost:8983/solr/#/ . There you will be able to see the Solr memory usage:
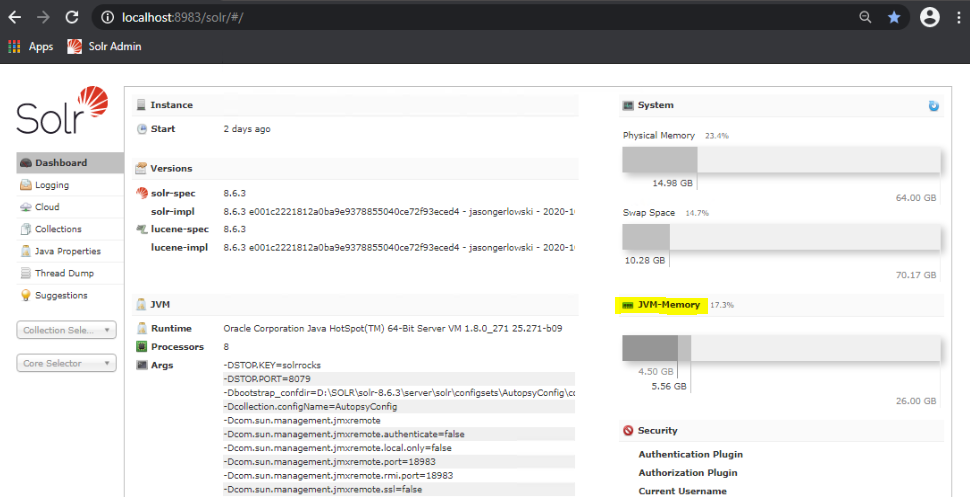
However, the dashboard does not show enough detail to know when Solr is out of heap, so it should only be used to identify that you are NOT having heap issues. Even if the dashboard shows that the Solr heap is fully used, it may or may not be an issue. It is best to use profiling tools like Java VisualVM. In order for VisualVM to connect to Solr, you will need to enable the JMX interface for Solr’s Java process. The details are described here:
Solr heap and other performance tuning is described in the following article:
Notes on Solr Performance Tuning
If you are going to work with large images (TBs) and KWS performance is important, the best approach is to use a network (Multi-User) Solr server.
Some notes:
-
A single Solr server works well for data sources up to 1TB; after that the performance starts to slow down. The performance doesn't "drop off the cliff," but it keeps slowing down as you add more data to the index. After 3TBs of input data the Solr performance takes a significant decline.
-
A single Multi-User Solr server may not perform much better than a Single-User Autopsy case. However, in Multi-User mode you can add additional Solr servers and create a Solr cluster. See the Adding More Solr Nodes (SolrCloud) section in the above documentation. These additional nodes are where the performance gains come from, especially for large input data sources. Apache Solr documentation calls this "SolrCloud" mode and each Solr server is called a "shard". The more Solr servers/shards you have, the better performance you will have for large data sets. On our test and production clusters, we are using 4-6 Solr servers to handle data sets of up to 10TB, which seems to be the upper limit. After that, you are better off breaking your Autopsy case into multiple cases, thus creating a separate Solr index for each case.
-
In our testing, a 3-node SolrCloud indexes data roughly twice as fast as single Solr node. A 6-node SolrCloud indexes data almost twice as fast as 3-node SolrCloud. After that we did not see much performance gain. These performance figures are heavily dependent on network throughput, machine resources, disk access speeds, and the type of data that is being indexed.
-
Exact match searches are much faster than substring or regex searches.
-
Regex searches tend to use a lot of RAM on the Solr server.
-
Indexing/searching of unallocated space really slows everything down because it is mostly binary or garbled data.
-
If you are not going to look at the search results until ingest is over then you should disable the periodic keyword searches. They will start taking longer as your input data grows. This can be done in Tools->Options->Keyword Search tab:
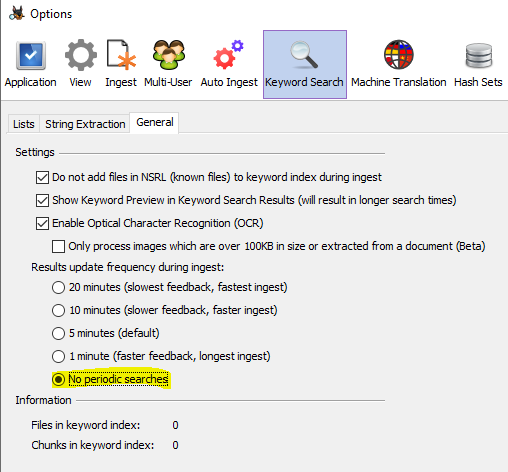
-
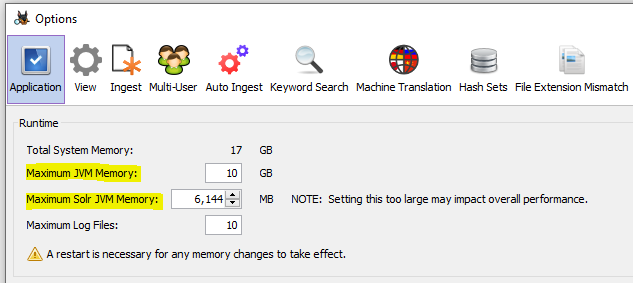
In Single-User mode, if you are ingesting and indexing data sources that are multiple TBs in size, then both Autopsy memory and especially the Solr JVM memory needs to be increased from their default settings. This can be done in Tools->Options->Application tab. We would recommend at least 10GB heap size for Autopsy and at least 6-8GB heap size for Solr. Note that these are "maximum" values that the process will be allowed to use/request. The operating system will not allocate more heap than the process actually needs.
Tuning Solr Server Commit Operations
When Autopsy is running in a multi-user cluster environment with multiple auto ingest nodes, it may be beneficial to tune the configuration of Solr "commit" operations.
Solr has two types of "commits" – hard commits and soft commits. These are explained in detail the following link: https://lucidworks.com/post/understanding-transaction-logs-softcommit-and-commit-in-sorlcloud/
In short:
- Hard commits flush newly indexed documents from RAM to Solr index on disk.
- Depending on configuration, hard commits may or may not make the newly indexed documents "visible" to search.
- Soft commits do not flush newly indexed documents to disk but they make the newly indexed documents "visible" to search.
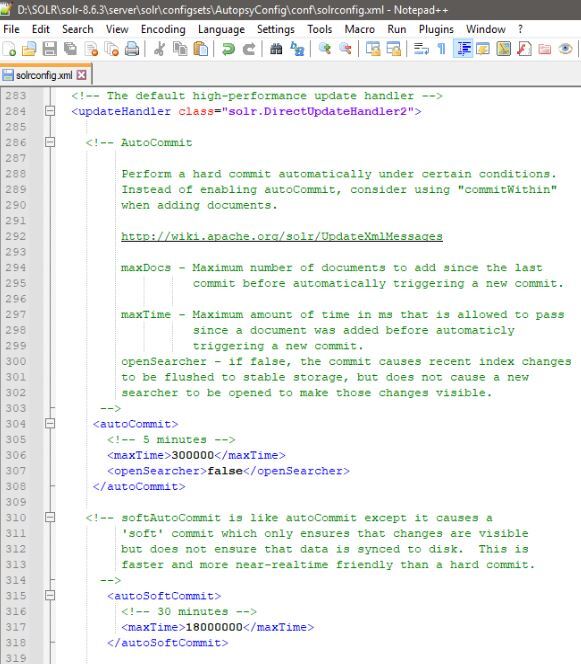
By default (when using AutopsyConfig) the Solr servers are performing a "hard" commit every 5 minutes and are also making the newly indexed documents "visible" to search. These operations can be costly when performed on a large index which is located on a shared network drive. In this stuation it can be very beneficial to modify Solr configuration (located in "SOLR_INSTALLATION_DIECTORY\server\solr\configsets\AutopsyConfig\conf\solrconfig.xml") with the following changes:
- Modify "hard commits" to still flush the newly created documents every 5 minutes but not make them "visible". This is accomplished by setting “openSearcher" to "false" in the "autoCommit" section of Solr configuration file. <li>Enable "soft commits" to be performed every 30 minutes thus making the newly indexed documents "visible" to search every 30 minutes. This is accomplished by enabling the "autoSoftCommit" section of Solr configuration file. The downside is that it may take up to 30 minutes to be able to search the latest document. Keep in mind that this only affects the scenario where an examiner is searching a case while the ingest is still ongoing. Autopsy automatically performs a commit after the ingest is complete so all the documents are immediately visible at that time.
The following image shows the Solr configuration changes discussed above:
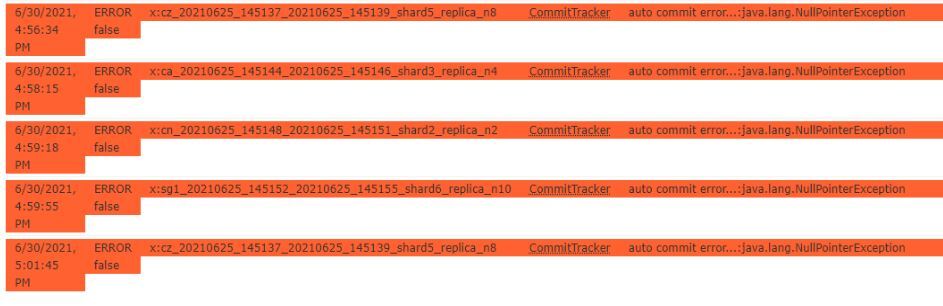
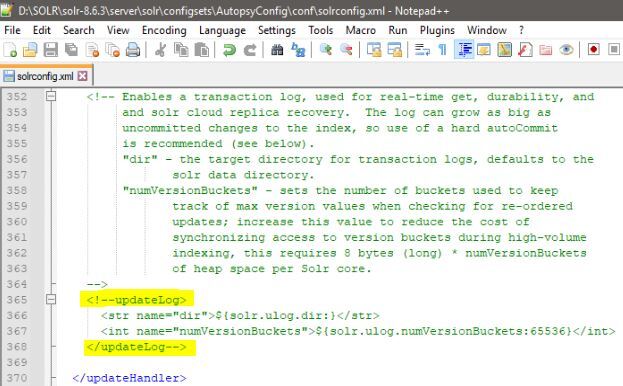
Until a hard commit is performed, by default Solr also maintains a transaction log which contains the raw text of every newly indexed document since last hard commit. When the Solr index is located on a network share, this again can be a very costly operation. Transaction logs can be disabled by commenting out the "updateLog" section of Solr configuration file:
Keep in mind that this has an unfortunate side effect of creating CommitTracker errors in Solr logs and Solr admin console. These errors can be ignored if transaction log has been intentionally disabled.