Introduction
The autopsy/test folder contains scripts that are necessary to run the regression test. Developers that are interested in running regression tests should run autopsy/test/script/regression.py. This guide will familiarize you with regression.py and walk you through a simple example at the end.
From a bird’s eye view, regression.py will:
- Run ingest on an image by starting up Autopsy and controlling the UI
- Generate a HTML report once ingest is complete
- Dump the case database and perform diffs on the gold standards. HTML reports are also diffed.
What’s important is that regression.py will enable you to isolate changes that you may have caused while developing and adding features.
Regression.py is also responsible for producing and saving gold standards for you. This allows your gold standards to evolve as your source code changes. In the following sections, we will learn how to accomplish this and what regression.py will need to know in order to run smoothly.
General
Regression.py will use the most recent Autopsy and Sleuthkit builds as a launching point. To ensure that your latest changes are included, you will need to make sure you build.
Terminology
Before we jump in, let's start off by defining some common terminology.
- Dump
- A dump refers to writing all case database INSERT statements to file. The case database is what Autopsy uses to persist its analysis. Items that are time or execution order dependent are obfuscated so that only meaningful changes are captured.
- Gold standard
- A gold standard is simply a dump that we designate to be the base expectation for any given ingest run. Some changes may add to this base (potentially positive) and some may modify or remove from this base (potentially negative). HTML reports will also be saved as gold standards.
- Diff
- A diff is the result of running the diff command against a new dump and a corresponding gold standard. If there are any regressions, they will hopefully be captured in these files.
Parameter Descriptions
Now that we have defined some common terminology, we can move on to learning which command line arguments regression.py can recognize. A regression test (one that may produce diffs) is the default unless otherwise specified. One and only one of the bolded arguments is required.
- -f PATH
- This indicates that a regression test should be run on a single image at the following PATH. However, it is strongly recommended that you specify an image (even if just one) in a config file instead (see -l below). There are no guarantees that this will be maintained as we are not currently using it internally.
- -r (for rebuild)
- This indicates that the gold standards should be rebuilt (overwritten) rather than diffed against. Rebuilds are necessary in order to update the gold standards for new (approved) diffs. This parameter needs no additional arguments.
- -b (for both compare and rebuild)
- This indicates that diffs should be produced on the current gold standards and then overwritten with new ones. It’s recommended to separate this behavior if you are not using version control on your gold standards. This is logically equivalent to running a regression test and then running with -r. This parameter needs no additional arguments.
- -l PATH
- This parameter specifies the PATH to the config file. The config file is very important and has its own Creating a Config File section.
- -u (Ignore unallocated space)
- Unallocated space can take a long time to ingest. Depending on your use case, you may omit processing unallocated space on all images. This parameter needs no additional arguments.
- -k (Do not delete the Solr index)
- This parameter indicates that the Solr index should be kept (rather than deleted) for each case. Some keyword hits will be written to the case database, however it may be useful to keep the index around if you’d like to debug or perform additional analysis. This parameter needs no additional arguments.
- -o PATH (path to output folder for diff files)
- This parameter indicates that diff files from multiple images should be aggregated into one folder at the specified PATH. If this argument is omitted, the diffs for an image can be found in its respective case output directory.
- -v (verbose mode)
- This parameter indicates that all ingest logs should automatically be printed to console. This parameter needs no additional arguments.
- -e ARG (Enable exception mode with given string)
- This parameter indicates that all lines from the ingest logs that contain the given ARG string should be printed to console. e.g. ‘-e IOException’
- -h (help)
Creating a Config File
The config file is essential to giving regression.py the details it needs to run. This file is simply an XML file with some expected tag names. We’ll dive into the tag names and their descriptions in the Tag Definitions section. But first, let’s start by taking a look at a template.
Template
Here is a complete config file template:
Tag Definitions
With our template above, let’s break down what some of these tags mean:
- <userCaseType>
- The value of this tag specifies the type of case that should be produced during the regression test. This may be significant since multi-user and single-user cases use different databases. Specify this value as “Single-user” to create only single user cases, “Multi-user” to create only multi-user cases, or “Both-user” to create both for each <image>. “Both-user” does two passes over all <image> tags. The first will be run as “Single-user” and the second will be run as “Multi-user”. Each <image> gets its own case.
- <build>
- This specifies the path to the Autopsy/Testing folder. This directory has code that will control the Autopsy UI during ingest. You can leave this path as relative, since the regression.py file already lives in the autopsy repository.
- <image>
- The value of this tag is the path to the image that will be ingested. A new case will be created for each one. You may have any number of image tags, but at least one.
- <singleUser_golddir>
- The value of this tag specifies the path to the directory that contains single user (See <userCaseType>) gold standards for each <image> tag. This will also be the place that new single user gold standards will be saved when run in rebuild mode (-r).
- <singleUser_outdir>
- The value of this tag will be the location on disk that single user case output (See <userCaseType>) will be stored. Each image will create a case folder in this directory.
- <timing>
- The value of this tag indicates that ingest time should be considered a test metric.
- <multiUser_golddir>
- The value of this tag specifies the path to the directory that contains multi user (see <userCaseType>) gold standards for each <image> tag. This will also be the place that new multi user gold standards will be saved when run in rebuild mode (-r).
- <multiUser_outdir>
- The value of this tag will be the location on disk that multi user case output (See <userCaseType>) will be stored. Each image will create a case folder in this directory. It is highly recommended that this folder be shared and the value be a UNC path.
- <dbHost>
- This tag is only relevant when run in multi user mode (See <userCaseType>). The value of this tag indicates the host name of the machine running the PostgreSQL database that Autopsy will use during ingest.
- <dbPort>
- This tag is only relevant when run in multi user mode (See <userCaseType>). The value of this tag indicates the port number that the PostgreSQL database is listening on at <dbHost>.
- <dbUserName>
- This tag is only relevant when run in multi user mode (See <userCaseType>). The value of this tag represents the database user Autopsy will act as when adding records to the case database on <dbHost> and <dbPort>.
- <dbPassword>
- This tag is only relevant when run in multi user mode (See <userCaseType>). The value of this tag represents the password to the <dbUserName> that Autopsy will act as when adding records to the case database on <dbHost> and <dbPort>.
- <solrHost>
- This tag is only relevant when run in multi user mode (See <userCaseType>). The value of this tag indicates the host name of the Solr service. The solr service is needed when running keyword search.
- <solrPort>
- This tag is only relevant when run in multi user mode (See <userCaseType>). The value of this tag indicates the port number Solr is listening on at <solrHost>.
- <messageServiceHost>
- This tag is only relevant when run in multi user mode (See <userCaseType>). The value of this tag indicates the host name of the ActiveMQ service that Autopsy will use for message brokerage between clients.
- <messageServicePort>
- This tag is only relevant when run in multi user mode (See <userCaseType>). The value of this tag indicates the port number that the ActiveMQ service is listening on at <messageServiceHost>.
Simple Example
Now that we are familiar with the parameter types and config file definitions, let's walk through a simple example. In this example, we are going to do a rebuild to establish our gold standards, introduce a regression, and discover it by running a test and examining the diffs.
Workspace
Here is how our workspace is set up:
- autopsy, sleuthkit
- These folders are clones of the Autopsy and Sleuthkit GitHub repositories. Sleuthkit was built using sleuthkit/win32/updateAndBuildAll.py and Autopsy was built in Netbeans 8.2.
- autopsy_regression_config
- This folder contains the regression_config.xml that is covered in the next subsection.
- autopsy_single_gold
- This folder will contain the gold standards for the <image> tags we define in the config file.
- autopsy_single_output
- This folder will contain the case output for each <image> tag ingest.
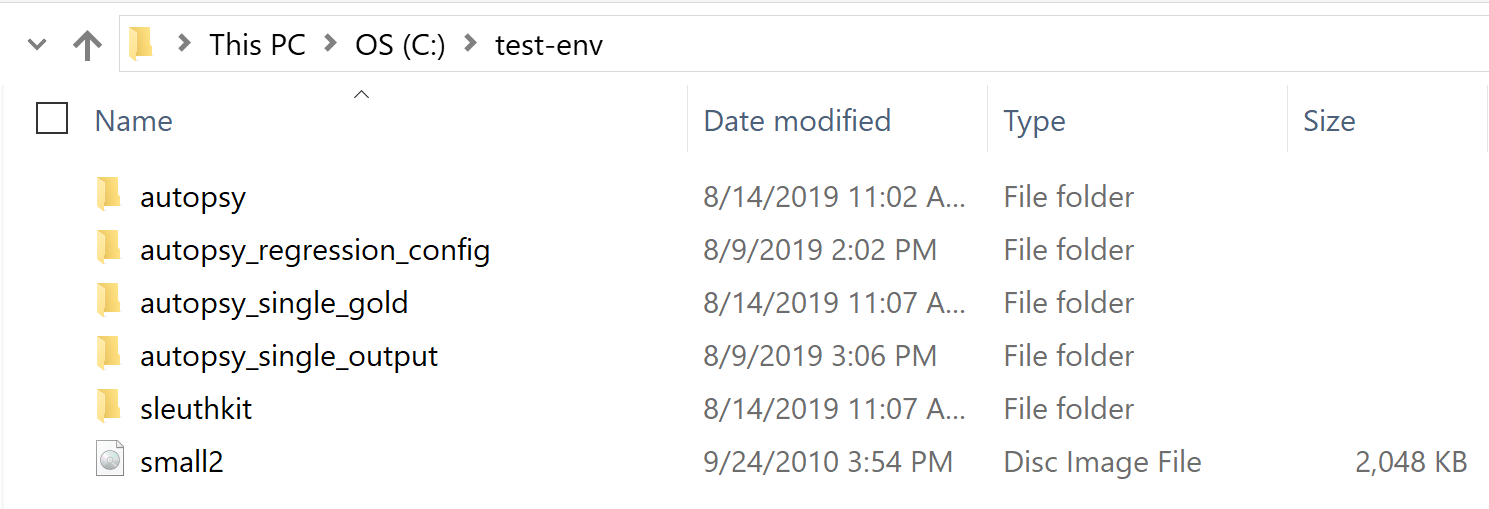
- small2
- The image that we will be used in our regression testing.
Config File
Here is the config file we will be using for our regression testing. This file is located in the autopsy_regression_config folder.
Rebuilding Gold Standards
In order to produce diffs, we need to first establish gold standards. We can do this by performing a rebuild (see -r in Parameter Descriptions).
Let’s run the following command from within autopsy/test/script directory.

This will instruct regression.py to make gold standards using our config file.
Regression.py is going to start ingesting the images found in the config file one by one from top to bottom. An ant command will be printed to console so we can see exactly what is being run. The Autopsy UI should become visible shortly after. Refrain from clicking on anything as this may interrupt the regression process.
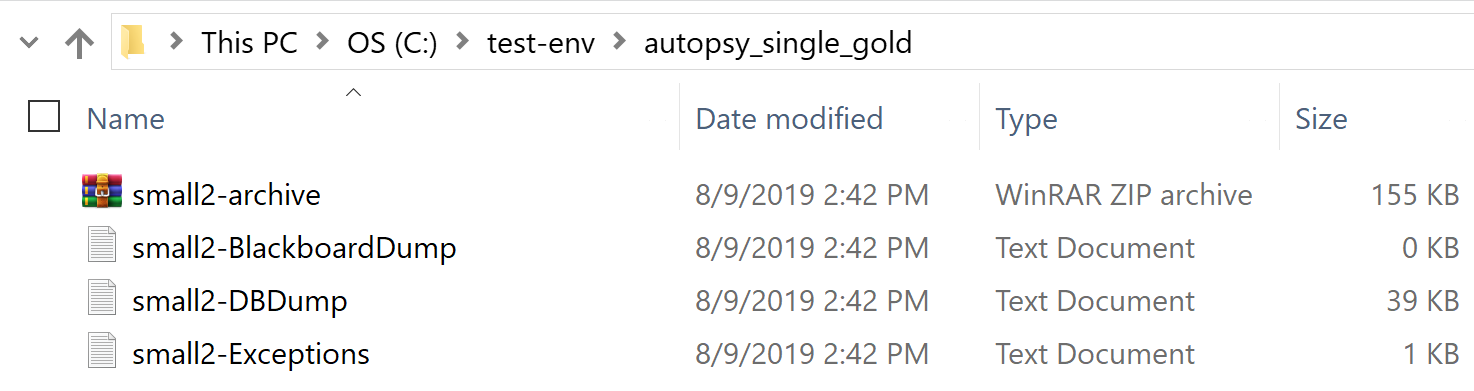
When this process is complete, the directory specified in <singleUser_golddir> should be populated with our gold standards. Here is what our folder looks like after the rebuild:
Performing a Regression Test
Now that we have our gold standards, it’s time to start our development cycle. Let's pretend we accidentally introduced a MIME type regression. All MIME types that were once text/plain are now mistakenly labeled as text/error-plain. Using the diffs that regression.py will produce, we can catch this before it becomes a problem.
Let’s run the following command from within the autopsy/test/script directory.

This will instruct regression.py to run a regression test using our config file.
Like the rebuild, an ant command will be printed to console so we can see exactly what is being run. Autopsy should become visible shortly. Refrain from clicking on anything as this may interrupt the regression process.
After completing on an image, Autopsy will disappear and you will be presented with a brief summary of the results (which may take some time to compute). Diffs that did not pass will be located in the output directory of the image. This process will continue for all images in the config file.
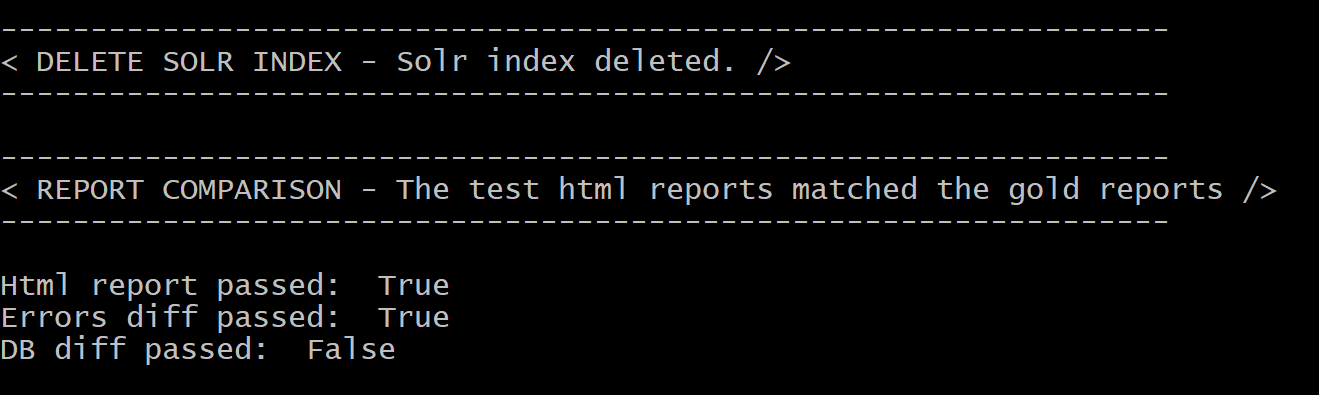
Since we only had one image in our config file and we ran in single-user mode, regression.py is finished. As expected, our case database diffs did not pass:
We’ll learn how to examine our diffs in the next section.
Examining the Diffs
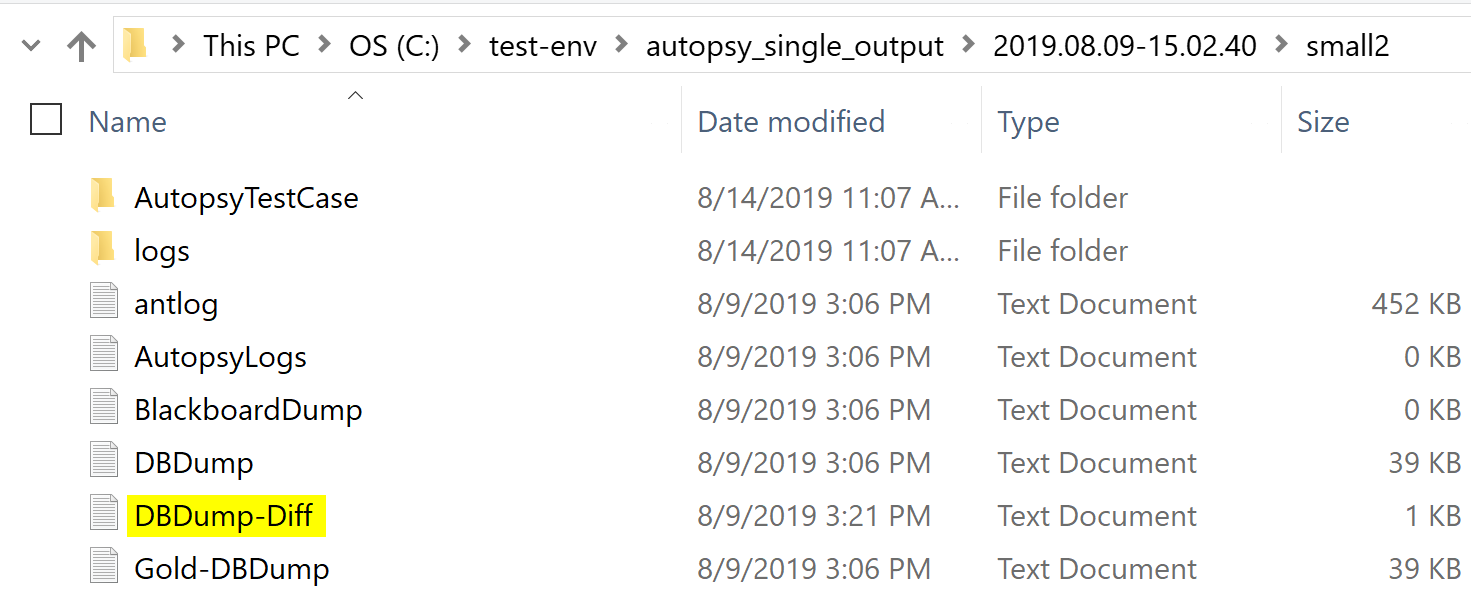
Let’s start by opening up our output folder:
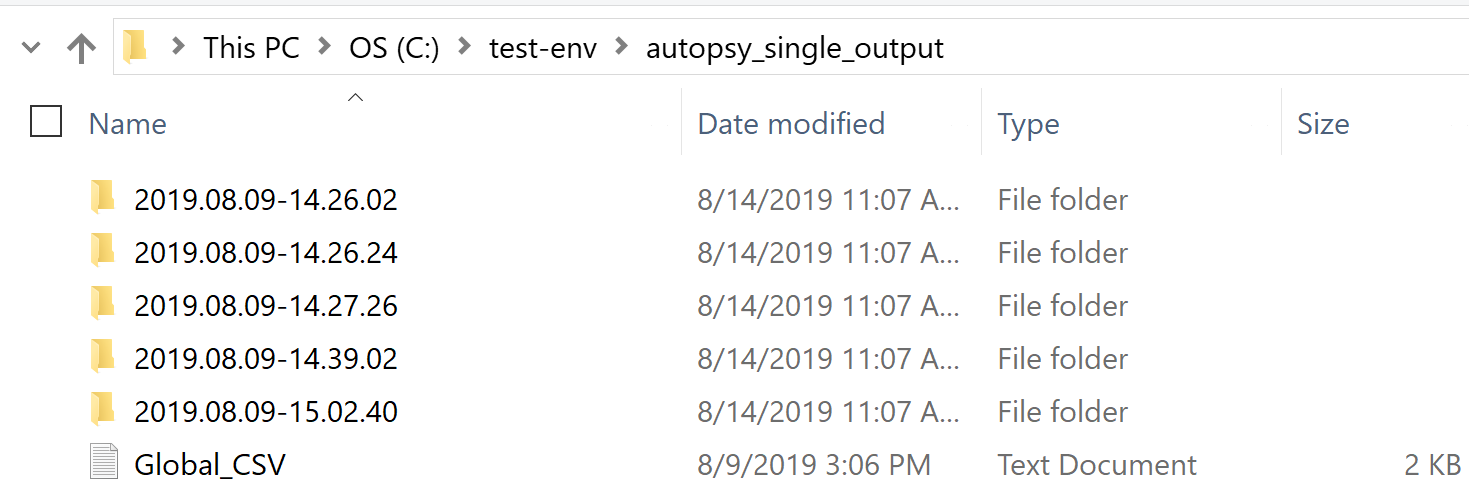
Each timestamp corresponds to the start of a regression or rebuild run. The most recent folder is where our latest diff will be contained. A folder named “small2” will be in this directory. Diff files will be stored at the top level of the image directory.
As expected, there is a DBDump-Diff file waiting for us.
We can examine our regressions by opening this file in Notepad++:

Since our dumps are INSERT statements from the database, we can see exactly which files have changed.
A line that’s preceded by a “<” indicates the record in the gold standard. A line that’s preceded by a “>” indicates the record in the current dump. As you can see on the second line, our MIME type was mistakenly changed. In the event that this change was correct, we can overwrite our current gold standards by running another rebuild (see -r in Parameter Descriptions).