A data source is the thing you want to analyze. It can be a disk image, some logical files, a local disk, etc. You must open a case prior to adding a data source to Autopsy.
Autopsy supports four types of data sources:
- Disk Image or VM File: A file (or set of files) that is a byte-for-byte copy of a hard drive or media card, or a virtual machine image. (see Adding a Disk Image)
- Local Disk: Local storage device (local drive, USB-attached drive, etc.). (see Adding a Local Disk)
- Logical Files: Local files or folders. (see Adding a Logical File)
- Unallocated Space Image Files: Any type of file that does not contain a file system but you want to run through ingest (see Adding an Unallocated Space Image File)
Adding a Data Source
You can add a data source in several ways:
- After you create a case, it automatically prompts you to add a data source.
- There is a toolbar item to add a Data Source when a case is open.
- The "Case", "Add Data Source" menu item when a case is open.
The data source must remain accessible for the duration of the analysis because the case contains a reference to the data source. It does not copy the data source into the case folder.
Regardless of the type of data source, there are some common steps in the process:
1) You will select the type of data source.

2) You will be prompted to specify the data source to add. This screen varies based on the data source type. Details on adding each type of data source are provided below.
NOTE: If you are adding a data source to a multi-user case, ensure that all Autopsy clients will have access to the data source at the same path. We recommend using UNC paths to ensure this consistent mapping.
3) Autopsy will perform a basic examination of the data source and populate an embedded database with an entry for each file in the data source. No content is analyzed in the process, only the files are enumerated.
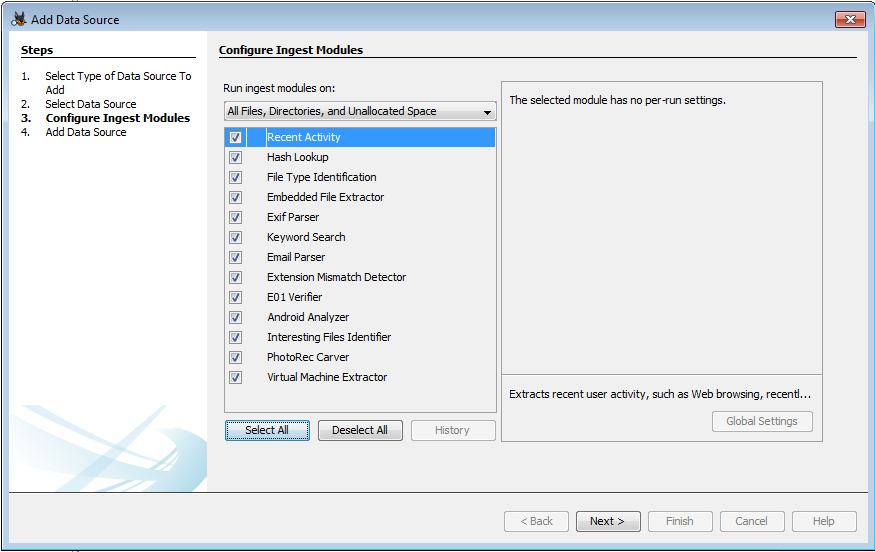
4) While it is examining the data source, you will be prompted with a list of ingest modules to enable. If one or more ingest profiles have been saved, there will be a screen before this asking whether to use one of the saved profiles or do a custom setup. See Ingest Modules for more information on setting up ingest profiles.
5) After you configure the ingest modules, you may need to wait for Autopsy to finish its basic examination of the data source.
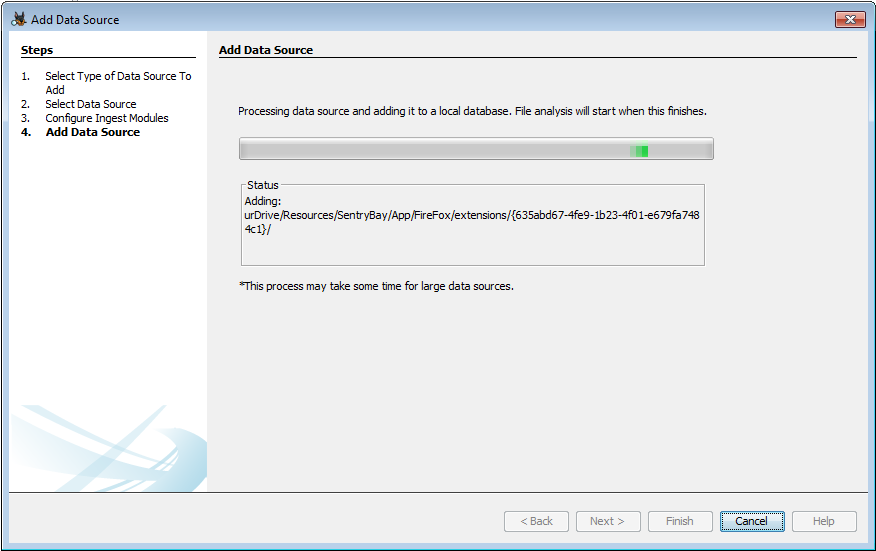
6) After the ingest modules have been configured and the basic examination of the data source is complete, the ingest modules will begin to analyze the file contents.
You cannot remove a data source from a case.
Adding a Disk Image
Autopsy supports disk images in the following formats:
- Raw Single (For example: *.img, *.dd, *.raw, *.bin)
- Raw Split (For example: *.001, *.002, *.aa, *.ab, etc)
- EnCase (For example: *.e01, *.e02, etc)
- Virtual Machines (For example: *.vmdk, *.vhd)
To add a disk image:
- Choose "Disk Image or VM File" from the data source types.
- Browse to the first file in the disk image. You need to specify only the first file and Autopsy will find the rest.
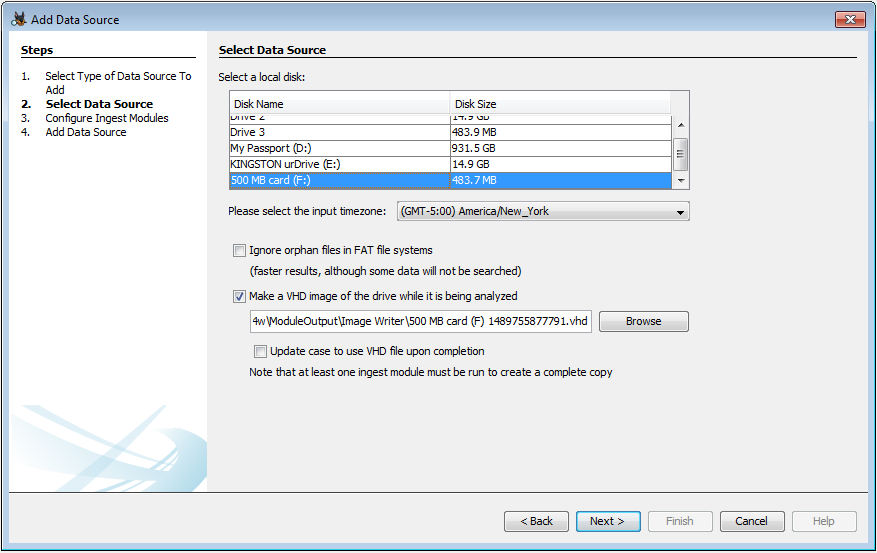
- Choose the timezone that the disk image came from. This is most important for when adding FAT file systems because it does not store timezone information and Autopsy will not know how to normalize to UTC.
- Choose to perform orphan file finding on FAT file systems. This can be a time intensive process because it will require that Autopsy look at each sector in the device.
Adding a Local Disk
Autopsy can analyze a local disk without needing to first make an image copy of it. This is most useful when analyzing a USB-attached device through a write blocker.
Note that if you are analyzing a local disk that is being updated, then Autopsy will not see files that are added after you add it as a data source.
You will need to be running Autopsy as an Administrator to view all devices.
There is an option to make a copy of the local disk as a VHD during analysis. This VHD can be loaded in Windows or analyzed through Autopsy. There is an additional option to update the image path in the case database to this newly created file. Enabling this option will allow you to browse the case data normally even after the local disk is removed. Note that at least one ingest module must successfully run in order to generate the complete image copy.
To add a local drive:
- Choose "Local Disk" from the data source types.
- Choose the device from the pull down list.
- Choose to perform orphan file finding. See comment in Adding a Disk Image about this setting.
- Choose whether to create a VHD copy of the local disk and whether to update the image path.
Adding a Logical File
You can add files or folders that are on your local computer (or on a shared drive) without putting them into a disk image. This is useful if you have only a collection of files that you want to analyze.
Some things to note when doing this:
- Autopsy ignores the time stamps on files that it adds this way because they could be the timestamps when they were copied onto your examination device.
- If you have a USB-attached device that you are analyzing and you choose to add the device's contents using this method, then note that it will not look at unallocated space or deleted files. Autopsy will only be able to see the allocated files. You should add the device as a "Logical Drive" to analyze the unallocated space.
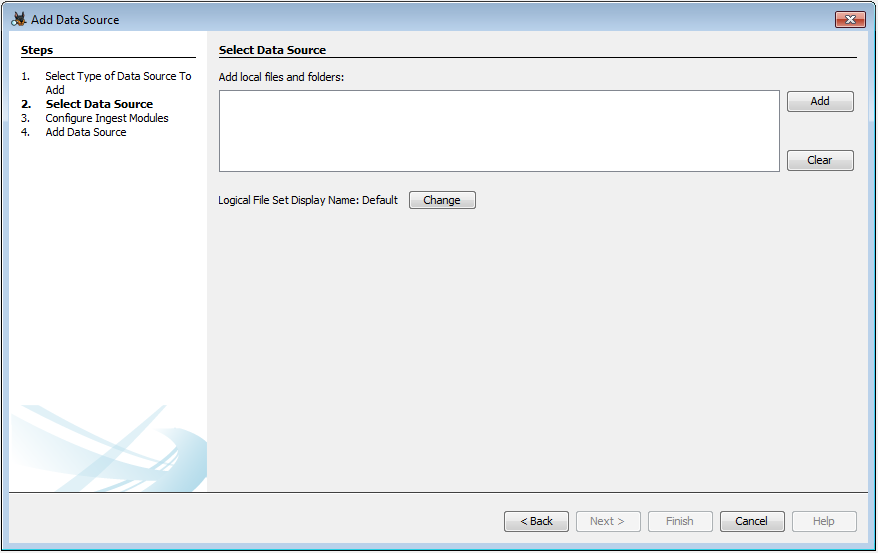
- You can modify the name of the Logical File Set from the default LogicalFileSet# by clicking the "Change" button as shown in the screenshot below:
To add logical files:
- Choose "Logical Files" from the data source types.
- Press the "Add" button and navigate to a folder or file to add. Choosing a folder will cause all of its contents (including sub-folders) to be added.
- Continue to press "Add" until all files and folders have been selected.
All of the files that you added in the panel will be grouped together into a single data source, called "LogicalFileSet" in the main UI.
Adding an Unallocated Space Image File
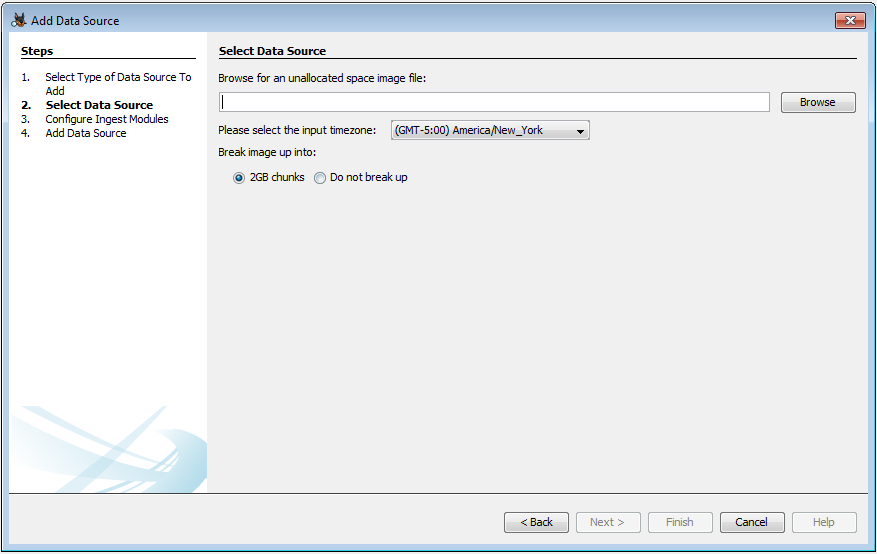
To add unallocated space image files:
- Choose "Unallocated Space Image File" from the data source types.
- Browse to the file.
- Choose whether to break the image up into chunks. Breaking the image up will give better performance since the chunks can be processed in parallel, but there is a chance that keywords or carved files that span chunk boundaries will be missed.